How to schedule feature releases
Placeholders in the code samples below are delimited by angle brackets (i.e. <placeholder-name>). You will need to replace them with the values that are correct in your situation for the code samples to run properly.
There's a whole host of reasons why you may want to schedule the release of a feature, such as:
- to release a feature at a specific date and time (for a product launch, for instance)
- to make a feature available only up until a specific moment (for a contest cutoff, for instance)
- to make a feature available during a limited period (for a 24 hour flash sale, for instance)
Depending on which version of Unleash you are using, there are two ways to schedule a feature release. If you are using Pro or Enterprise version 4.9 or later, you can use strategy constraints. Otherwise, you can use custom activation strategies.
In this guide we'll schedule a feature for release at some point in time. The exact same logic applies if you want to make a feature available until some point in the future. Finally, if you want to only make a feature available during a limited time period, you can easily combine the two options.
Prerequisites
This guide assumes that you've got the following:
- some basic experience with Unleash
- a running instance of Unleash and connected clients (where applicable)
- an existing feature flag that you want to schedule the release for
Schedule feature releases with strategy constraints
Strategy constraints are the easiest way to schedule feature releases (as long as your SDKs are up to date). You can use this approach with any strategy you want. The strategies will work just as they normally do, they just won't become active until the specified time. For example: with the standard strategy, the feature would become available to all your users at the specified time; with a gradual rollout, the rollout would start at the specified time.
Step 1: Add an activation strategy with a date-based constraint
Scheduling a release via the UI
To schedule a feature release via the UI:
- Add the desired activation strategy to the feature
- Open the constraint creator by using the "Add constraint" button
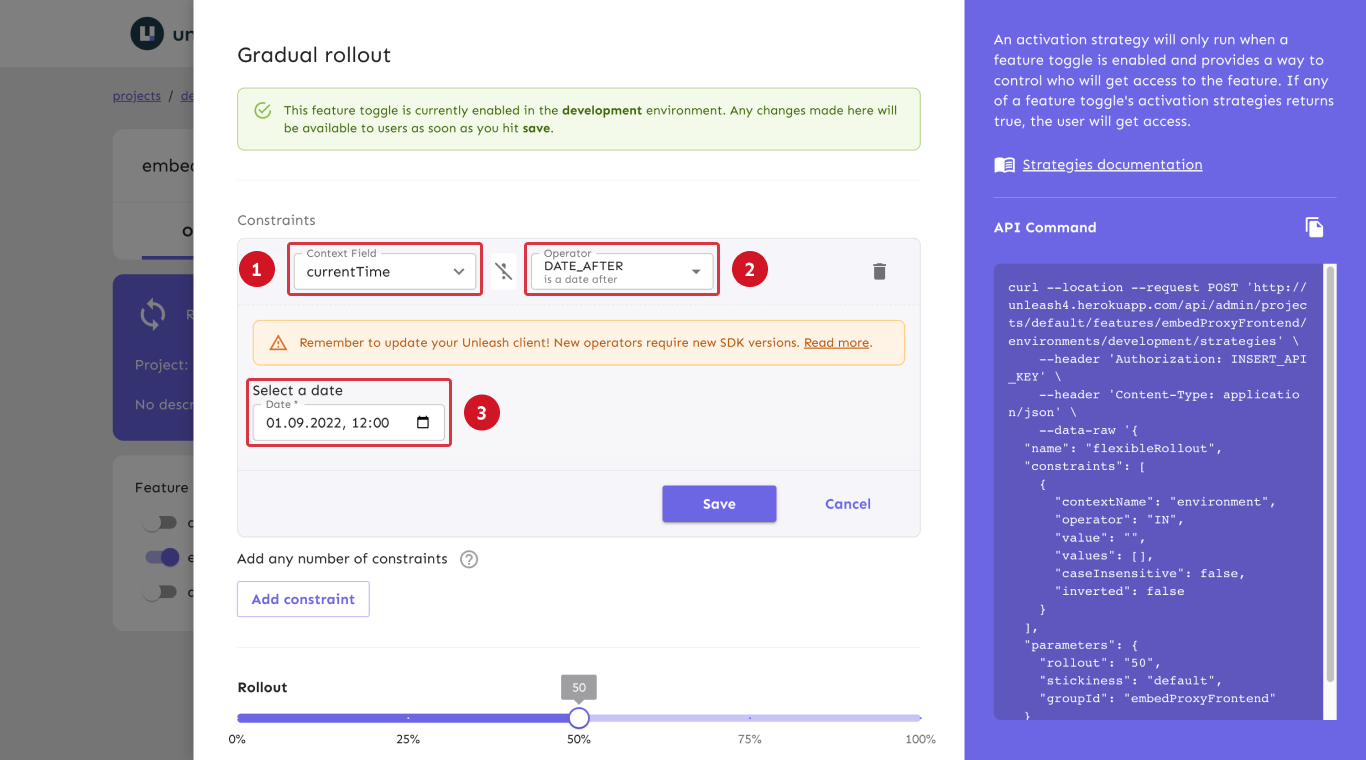
- Add a date-based constraint by selecting the
currentTimecontext field (step 1 in the below image), choosing theDATE_AFTERoperator (step 2), and setting the point in time where you want the feature to be available from (step 3)
Scheduling a release via the API
To add an activation strategy via the Admin API, use the feature's strategies endpoint to add a new strategy (see the API documentation for adding strategies to feature flags for more details).
The payload's "name" property should contain the name of the strategy to apply (see activation strategies reference documentation for all built-in strategies' modeling names).
The "constraint" object should have the same format as described in the code sample below. The activation date must be in an RFC 3339-compatible format, e.g. "1990-12-31T23:59:60Z".
- HTTP
- cURL
- HTTPie
POST <unleash-url>/api/admin/projects/<project-id>/features/environments/<environment>/strategies
Authorization: <API-token>
content-type: application/json

{
  "name": "default",
  "constraints": [
    {
      "value": "<activation-date>",
      "operator": "DATE_AFTER",
      "contextName": "currentTime"
    }
  ]
}
curl -H "Content-Type: application/json" \
     -H "Authorization: <API-token>" \
     -X POST \
     -d '{
  "name": "default",
  "constraints": [
    {
      "value": "<activation-date>",
      "operator": "DATE_AFTER",
      "contextName": "currentTime"
    }
  ]
}' \
     <unleash-url>/api/admin/projects/<project-id>/features/environments/<environment>/strategies
echo '{
  "name": "default",
  "constraints": [
    {
      "value": "<activation-date>",
      "operator": "DATE_AFTER",
      "contextName": "currentTime"
    }
  ]
}' \
| http POST \
  <unleash-url>/api/admin/projects/<project-id>/features/environments/<environment>/strategies \
  Authorization:<API-token>
The "operator" property in the code sample can be replaced with any of the other date and time-based operators according to your needs.
Schedule feature releases with custom activation strategies
To schedule feature releases without using strategy constraints, you can use custom activation strategies. This requires defining a custom strategy and then implementing that strategy in your SDKs. For detailed instructions on how to do either of these things, refer to their respective how-to guides:
Step 1: Define and apply a custom activation strategy
Define a strategy that takes a parameter that tells it when to activate (visit the custom activation strategy reference documentation for full details on definitions):
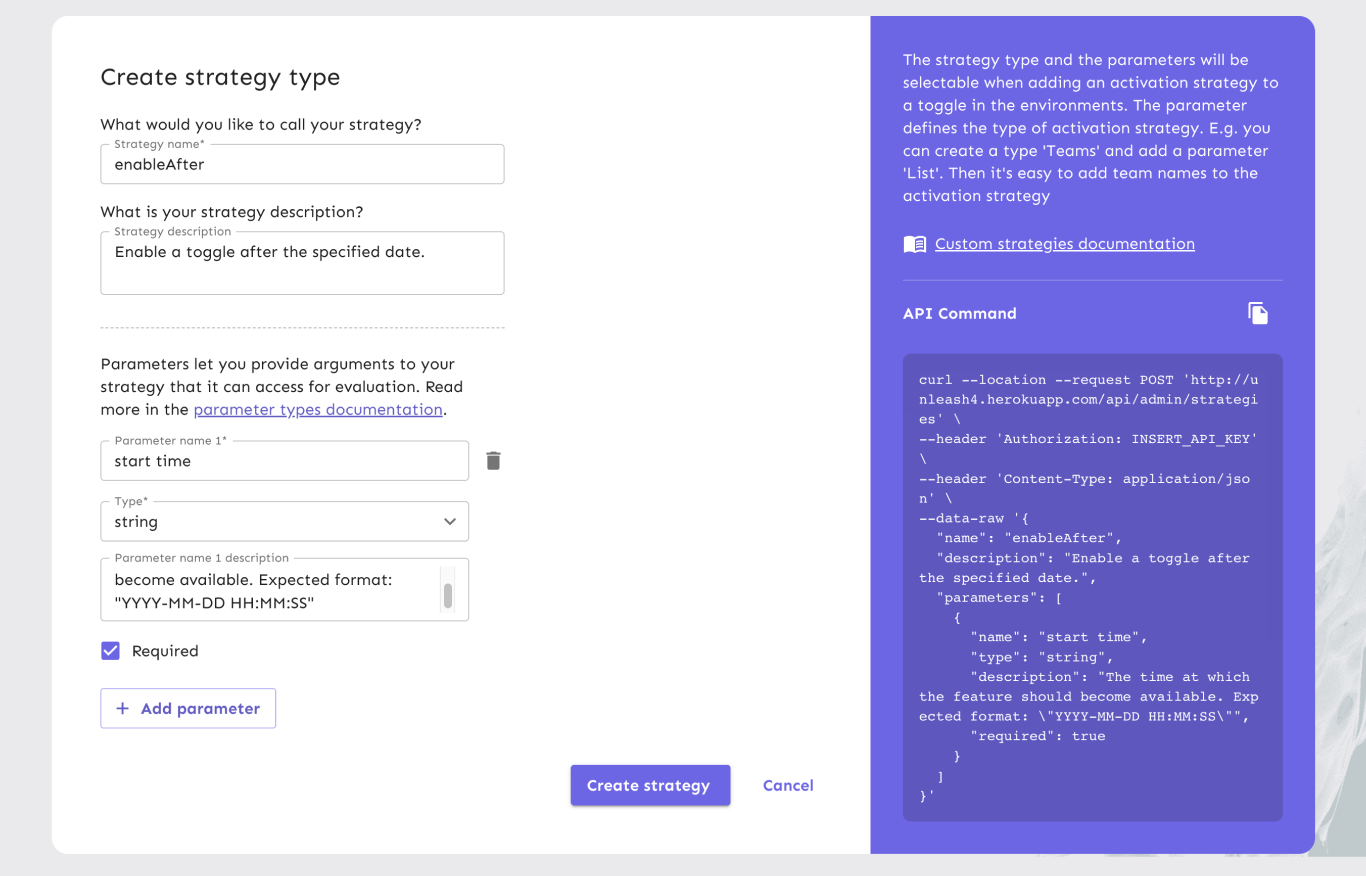
- Give the strategy a name. We'll use
enableAfter. - Give the strategy a required string parameter where the user can enter the time at which the feature should activate. Be sure to describe the format that the user must adhere to.
- Save the strategy
Apply the strategy to the feature flag you want to schedule.

Step 2: Implement the custom activation strategy in your clients
In each of the client SDKs that will interact with your feature, implement the strategy (the implementation how-to guide has steps for all SDK types).